一、What is YUV?
YUV是编译true-color颜色空间(color space)的种类,Y’UV, YUV, YCbCr,YPbPr等专有名词都可以称为YUV,彼此有重叠。“Y”表示明亮度(Luminance、Luma),“U”和“V”则是色度、浓度(Chrominance、Chroma),如果没有U(Cb)、V(Cr),只有Y亮度信息,也可以显示图像,即黑白图像没有色彩而已。
YUV这种彩色编码系统,主要用于视频、图形处理管线中(pipeline)。最终呈现在屏幕上的图像,都是有RGB格式呈现的,但是为什么引入YUV呢?这是因为YUV可节省带宽,YUV分为多种格式,其中YUV420P类型采样数据大小为RGB格式的一半,在直播模式下,数据传输时大小显得尤为重要。
直播模式下,YUV与RGB的应用:
1.摄像头采集视频帧,设置输出的数据格式为YUV420P。
2.视频帧编码
3.视频帧数据推流传输
4.视频帧数据解码
5.YUV420P数据转换为RGB格式,渲染。
YUV采样格式:
1.YUV444
2.YUV422
3.YUV420
YUV420:
1.YUV420P
1).YU12格式(YYYYUUVV)
2).YV12格式(YYYYVVUU)
即先存储Y分量,再存储U、V分量,区别在于:YU12是先Y再U后V,而YV12是先Y再V后U。
3.YUV420SP
1).NV12格式(YYYYUVUV)
2).NV21格式(YYYYVUVU)
NV12和NV21格式都属于YUV420SP类型。NV12先存Y分量,再UV进行交替存储,NV21先存Y分量,在VU交替存储。
| YUV 类型 | 采样格式 |
|---|---|
| YUV 420P 类型 | YV12 格式、YU12 格式 |
| YUV 420SP 类型 | NV12 格式、NV21 格式 |
YUV其他格式可参考:一文读懂 YUV 的采样与格式
二、YUV、RGB转换公式
YCbCr是被ITU定义在标准ITU-R BT.601(标清)、ITU-R BT.709(高清)、ITU-R BT.2020(超高清)中的一种色彩空间,是一种针对RGB所做的编码,是YUV压缩和偏移的版本,YCbCr通常用于视频和图像压缩和传输,在视频编解码中的”YUV图像”指的就是 YCbCr。
YCbCr和RGB的转换,不同的标准有不同的转换公式,并且需要区分Video Range和Full Range。
Full Range:计算机设备 PC Level(色域全面[0-255])
Video Range:电视机等消费类产品 Studio Level(色域不够全面[16-235]),省略不常用的色域。
移动端在直播模式下通常使用Video Range(非必然)。
iOS CoreVideo中定义如下:
1 | kCVPixelFormatType_420YpCbCr8BiPlanarVideoRange = '420v', |
Full Range的取值范围为luma=[0,255] chroma=[1,255],而Video Range是luma=[16,235] chroma=[16,240]。
转换公式如下:
1、BT.601, which is the standard for SDTV. RGB to YUV:
Y = 0.299R+0.587G+0.114B
Cr = V = 0.713(R−Y)=0.500R−0.419G−0.081B
Cb = U = 0.564(B−Y)=−0.169R−0.331G+0.500B
YUV to RGB:
R = 1.164(Y−16.0/255)+1.596(V−128.0/255)
G = 1.164(Y−16.0/255)−0.813(V−128.0/255)−0.391(U−128.0/255)
B = 1.164(Y−16.0/255)+2.018(U−128.0/255)
即:
R = 1.164Y+1.596V-0.871;
G = 1.164Y-0.813V-0.391U+0.529;
B = 1.164Y+2.018U-1.0729;
上述RGB的取值范围是[0,1]。Y的范围是 [0,1],Cr和Cb的范围是[−0.5,0.5]。
也有转换公式是这样的:
RGB to YUV:
Y = 0.257R+0.504G+0.098B+16
Cr = V = 0.439R−0.368G−0.071B+128
Cb = U = −0.148R−0.291G+0.439B+128
YUV to RGB:
R = 1.164(Y−16)+1.596(V−128)
G = 1.164(Y−16)−0.813(V−128)−0.391(U−128)
B = 1.164(Y−16)+2.018(U−128)
注意在上面的式子中,RGB的范围是[0,255],Y的范围是[16,235],UV的范围是[16,239],如果超出这个范围就截断处理。
2、BT.601 full range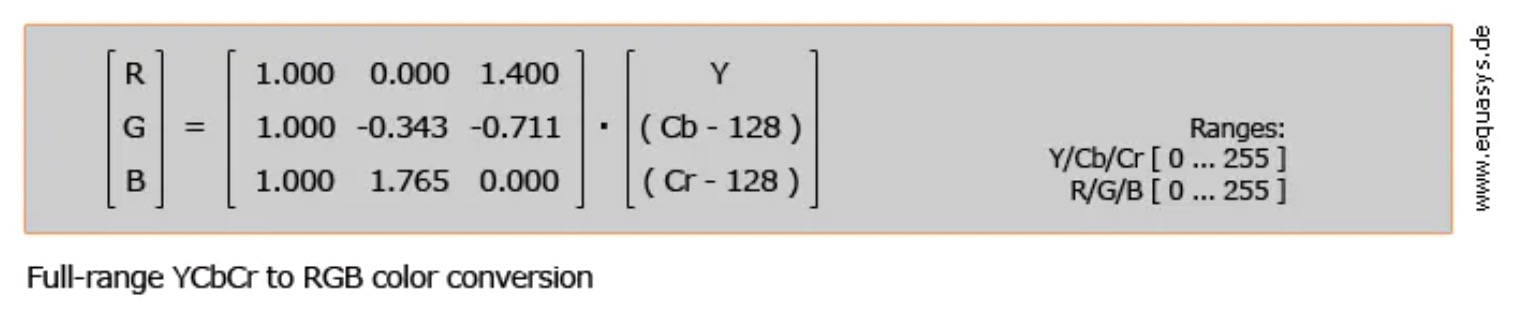 RGB to YUV:
Y = 0.299 * R + 0.587 * G + 0.114 * B
Cr = V = -0.169 * R - 0.331 * G + 0.500 * B
Cb = U = 0.500 * R - 0.439 * G - 0.081 * B
YUV to RGB:
R = Y + 1.400V - 0.7
G = Y - 0.343U - 0.711V + 0.526
B = Y + 1.765U - 0.883
上述式子中RGB的范围是[0,255],Y的范围是[0,255],UV的范围是[0,255]如果超出这个范围就截断处理。
3、BT.709, which is the standard for HDTV.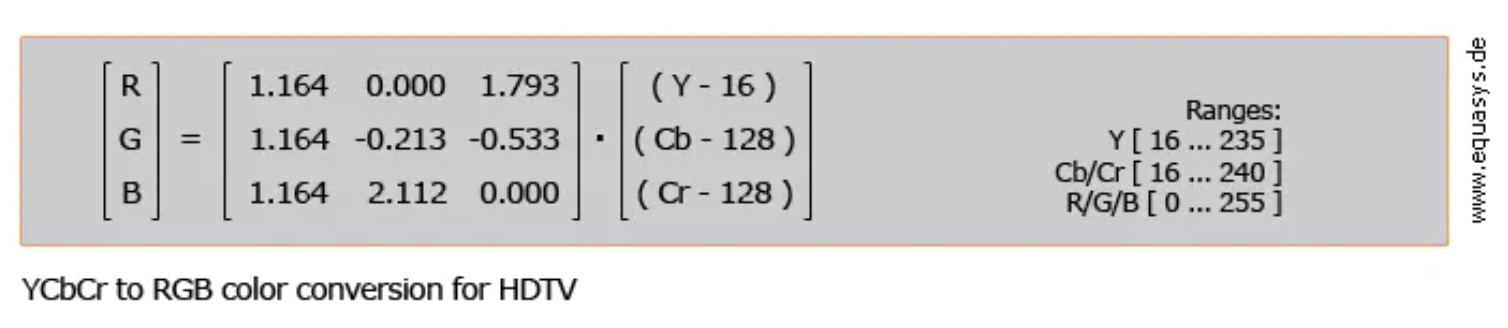 RGB to YUV:
Y = 0.0627 + 0.183 * R + 0.614 * g + 0.062 * b
Cb = U = 0.5 - 0.101 * R - 0.339 * g + 0.439 * b
Cr = V = 0.5 + 0.439 * R - 0.399 * g - 0.040 * b
YUV to RGB:
R = 1.164Y + 1.739V - 0.97
G = 1.164Y - 0.213U - 0.533V + 0.301
B = 1.164Y + 2.112U - 1.129
上述式子中,RGB的范围是[0,255],Y的范围是[16,235],UV的范围是[16,239],如果超出这个范围就截断处理。
三、常用矩阵
常用色彩3X3矩阵定义如下:
1 | // BT.601, which is the standard for SDTV. |